


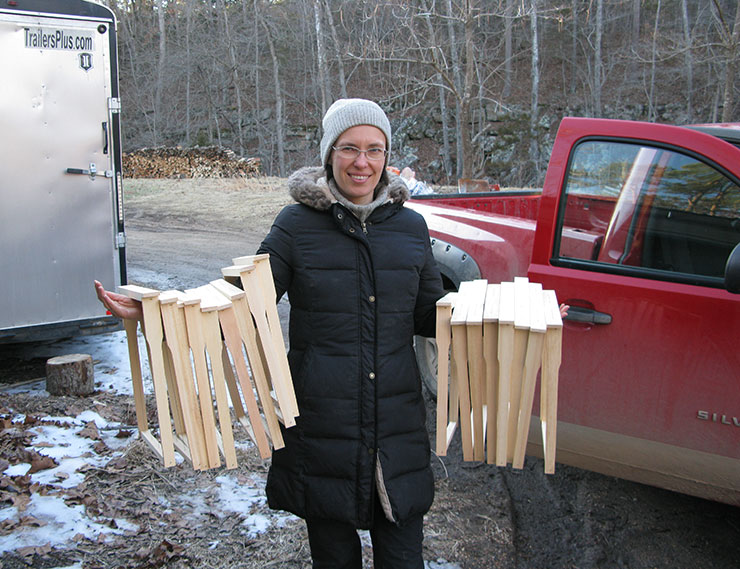
Layens Bee Bed – Sleep With The Bees – Free Plans
One of the big pleasures of beekeeping is relaxing in a bee bed — an extra-long horizontal hive. Lie down, separated from 200,000 bees by only 3/4” of wood, and get immersed in their warmth, vibration, smells, and buzzing. All your troubles slip away and you blissfully fall asleep like a baby, to awaken refreshed and renewed — a gift sweeter than honey. This healing experience is hard to put into words until you try it yourself.
Four strong colonies generate so much heat you will break a sweat like in a sauna. The fanning of thousands of wings produces a palpable vibration, giving you a gentle massage. Bee sounds fill your head and lull you to sleep. And a special ventilation system circulates the floral fragrance of the hive around you. Enjoy!
This page has plans for building a deluxe Layens bee bed. For a Langstroth bee bed, see here.
MATERIAL LIST
- 2” x 10” x 10’, untreated (4).
- 2” x 4” x 10’, untreated (2).
- 1” x 12” x 8’, untreated (4).
- 3/4” plywood, untreated, 4’ x 8’ sheet.
- 2-7/8” structural screws — HeadLOK or similar (16).
- 2-1/2” deck screws (8).
- 2” deck screws (1 lb).
- 1-5/8” deck screws (1 lb).
- 1-1/4” construction screws (12).
- 5/16” T50 staples (150).
- Insect screen, stainless steel or aluminum, 36” x 32”.
- Titebond III wood glue, 8 oz bottle.
- Table saw.
- Dado blade set.
- Sliding miter saw (alternative: circular saw with a guide, or handsaw).
- Router with 1/2” straight bit and 1/8” radius round over bit.
- Oscillating saw with straight blade for wood.
- Cordless drill / driver; #8 countersink pilot hole drill bit; 11/64” drill bit; 7/8” paddle drill bit; driver bits for screws.
- Manual staple gun for T50 staples.
- Clamps, 24” or longer (12).
- Metal shears.
- Tape measure; carpenter’s square.
DIMENSIONS
- Overall L 85”
- Overall W 37”
- Overall H 18-1/8”
- Hive inner L 82”
- Hive inner W 13-11/16”
- Hive inner depth 17-3/8” (incl. 3/8” cover boards)
- Bee space side of frame 3/8”
- Bee space under frames 1-1/16” (aids bee traffic and ventilation)
- Capacity 52 Layens frames (four colonies 12-13 frames each)
PART LIST
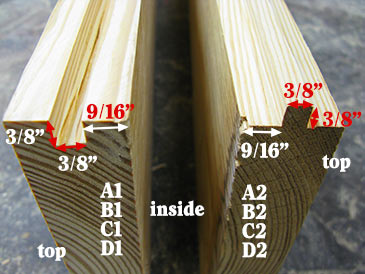
| A1 | 82-3/4” x 8-7/8” x 1-1/2” | front wall, upper half; groove; entrance holes |
| A2 | 82-3/4” x 8-7/8” x 1-1/2” | front wall, lower half; tongue; rabbet |
| B1 | 82-3/4” x 8-7/8” x 1-1/2” | back wall, upper half; groove; entrance holes |
| B2 | 82-3/4” x 8-7/8” x 1-1/2” | back wall, lower half; tongue; rabbet |
| C1 | 37” x 8-7/8” x 1-1/2” | left wall, upper half; groove; notches; dadoes; entrance holes |
| C2 | 37” x 8-7/8” x 1-1/2” | left wall, lower half; tongue; partial rabbet |
| D1 | 37” x 8-7/8” x 1-1/2” | right wall, upper half; groove; notches; dadoes; entrance holes |
| D2 | 37” x 8-7/8” x 1-1/2” | right wall, lower half; tongue; partial rabbet |
| M | 83-3/16” x 14-7/8” x 3/4” | hive bottom, plywood |
| E | 85” x 3-1/2” x 1-1/2” | front rail; entrance holes |
| F | 85” x 3-1/2” x 1-1/2” | back rail; entrance holes |
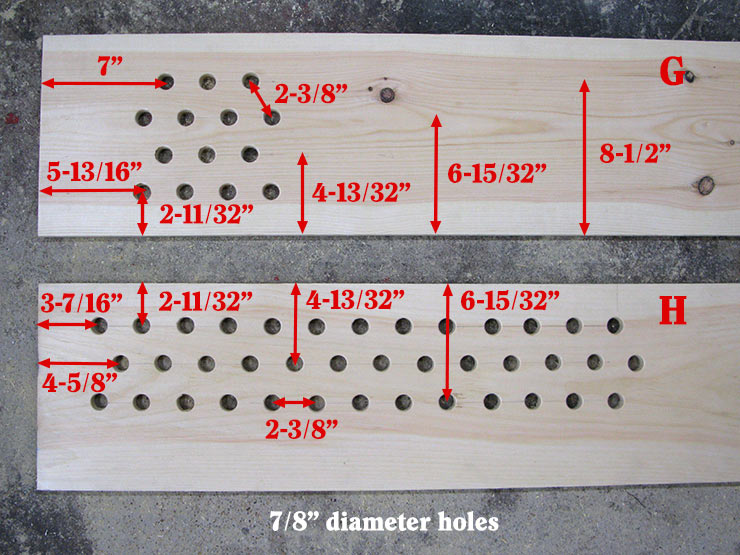
| G | 85” x 11-1/4” x 3/4” | extension leaf, front; vent holes |
| H | 85” x 11-1/4” x 3/4” | extension leaf, back; vent holes |
| Y (2) | 82” x 8-5/8” x 3/4” | tunnel bottom |
| J (4) | 8-5/8” x 1-1/4” x 3/4” | tunnel dividers |
| K (4) | 82” x 1-1/2” x 3/4” | slats supporting tunnel bottom |
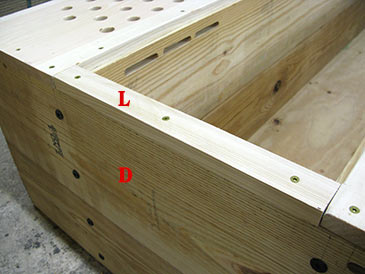
| L (2) | 14-7/16” x 1-1/2” x 3/4” | hive end closure |
| N (24) | 14-3/8” x 3-1/2” x 3/8” | cover boards |
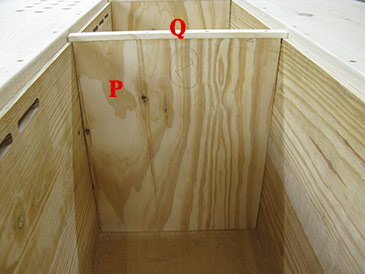
| P (4) | 16-5/8” x 13-5/8” x 3/4” | divider boards, plywood |
| Q (4) | 14-5/16” x 3/4” x 3/8” | divider top bar |
| R (2) | 9-1/4” x 8-1/2” | insect screen for vents in G |
| S (2) | 32” x 6” | insect screen for vents in H |
BUILDING INSTRUCTIONS
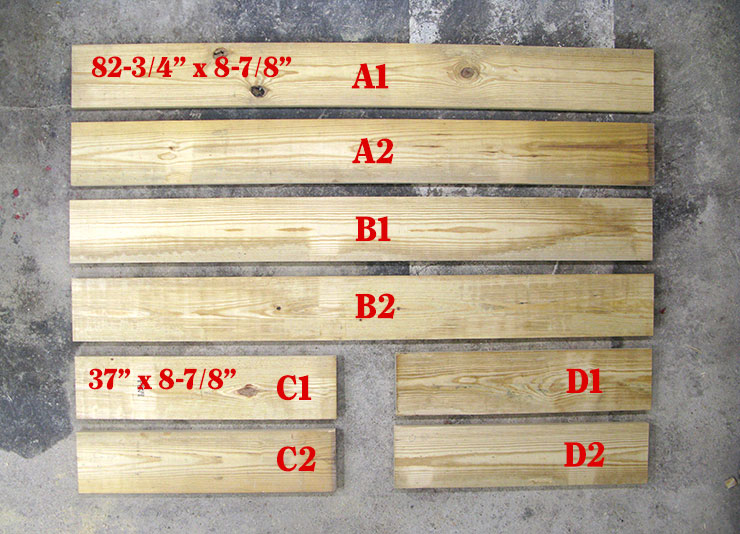
Step 1. Rip four 2” x 10” boards 8-7/8” wide. Square and cut each board into two pieces: 82-3/4” and 37” long. Mark the long boards A1, A2, B1, B2; mark the short boards C1, C2, D1, D2. Mark the inner/outer sides and the top/bottom orientation on each board. These are the walls and the main frame of the hive.
Step 2. Cut two pieces of 2” x 4” — 85” long. Mark as E and F; mark the inside/outside and the top/bottom orientation. These are the front and back rails of the bee bed. Save the cutoffs for Step 22.
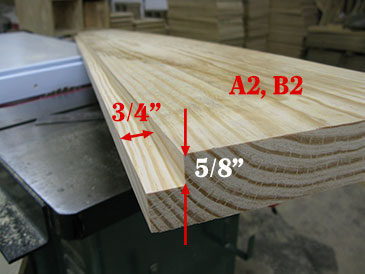
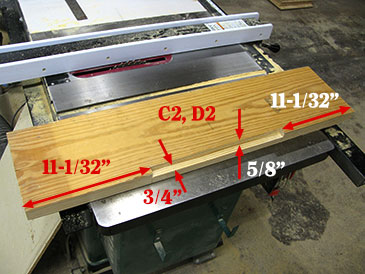
Step 3. Cut a rabbet 3/4” wide by 5/8” deep the full length of the inner bottom edge of A2 and B2. Cut a rabbet 3/4” wide by 5/8” deep in the inner bottom edge of C2 and D2, stopping 11-1/32” shy of each end. These rabbets will accept the hive bottom. (I cut each rabbet in two passes on the table saw; on C2 and D2, I make plunge cuts and finish off with an oscillating saw.)
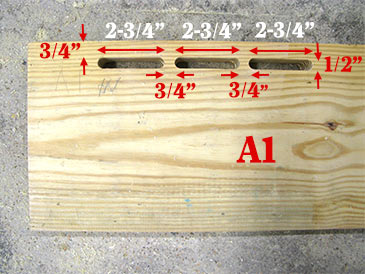
Step 4. Cut the entrance slots in A1, B1, C1, D1, and E. Each entrance is 1/2” tall and 3/4” from the top edge of the board. I make these holes with a router with 1/2” straight bit and a router-mounted guide/fence, in three passes.
- A1 — two series of three holes, 3-3/8” from each end of the board; holes 2-3/4” long with 3/4” between the holes.
- E — two series of three holes, 4-1/2” from each end of the board; holes 2-3/4” long with 3/4” between the holes.
- B1 — two series of three holes, 24-1/16” from each end of the board; holes 2-3/4” long with 3/4” between the holes.
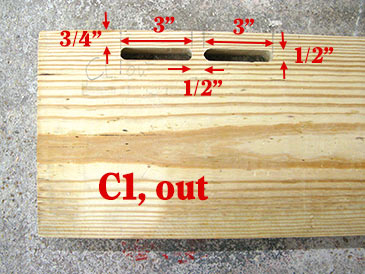
- C1 — two holes 3” long each, with 1/2” between them; the first hole is 3-9/16” from the left end of the board (with the outer side facing you).
- D1 — two holes 3” long each, with 1/2” between them; the first hole is 3-9/16” from the right end of the board (with the outer side facing you).

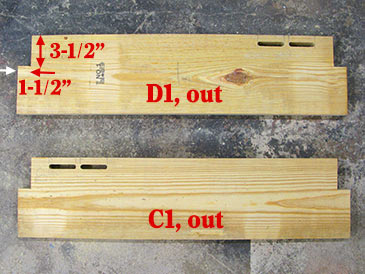
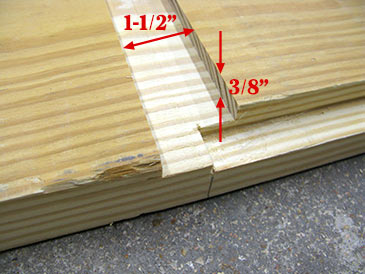
Step 5. Notch both top corners of C1 and D1. Notches 1-1/2” wide by 3-1/2” deep.
Step 6. Cut a groove 3/8” wide and just over 3/8” deep, the entire length of the bottom of A1, B1, C1, and D1, 9/16” from the inner surface of the board. Cut a tongue 3/8” wide by 3/8” tall the entire length of the top of A2, B2, C2, and D2, 9/16” from the inner surface of the board.
Step 7. Join the wall panels: A1+A2, B1+B2, C1+C3, D1+D2. Make sure the outside of two pieces face the same way; glue the joint and clamp for several hours, preferably overnight.
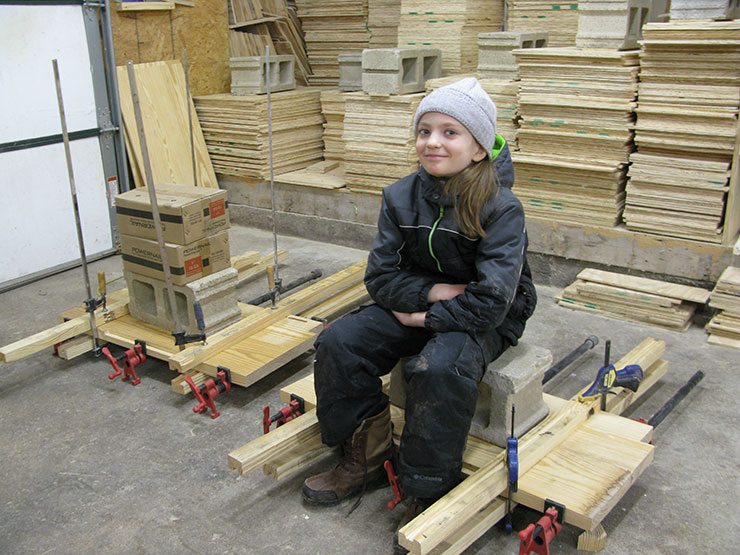
OK, Zaryana comes to say she baked almond flour cookies for supper. I tighten the last clamp and hasten home for the night.
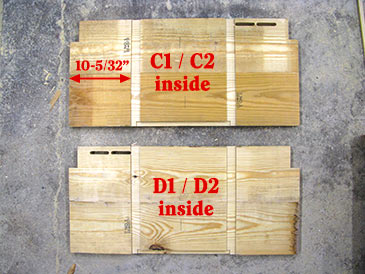
Step 8. After glue sets (I wait at least 12 hrs) cut dadoes (grooves) 1-1/2” wide by 3/8” deep, on the inside of C1/C2 and D1/D2 panels, 10-5/32” from each butt end.
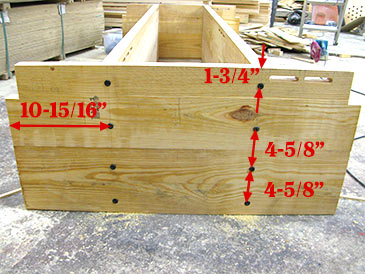
Step 9. Assemble the box. Insert walls A and B into dadoes in C (make sure the exterior sides of A and B face out). Make sure A and B are square to C and the tops of A, B, and C are all flush. Predrill from the outside of C with 11/64” bit and connect on 2-7/8” structural screws, four per joint. The screw line is 10-15/16” from the end of the panel; the screws are 1-3/4” from the top and bottom; 4-5/8” between the screws. Repeat by connecting A and B to D.

Step 10. Take the four 1” x 12” boards and cut parts G, H, Y (2), L (2), Q (4), and K (multiple pieces) as shown.
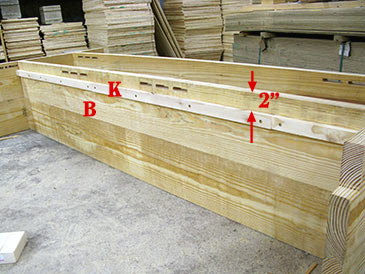
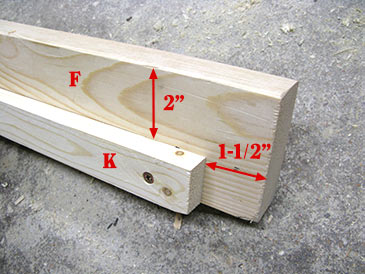
Step 11. Attach K the full length of A and B, on the outside, 2” from the top edge, using 1-5/8” screws. (K is composed of multiple pieces). Attach K the length of E and F, on the inside, 2” from the top edge, stopping 1-1/2” from each end (use 1-5/8” screws). Attach F to D and C, and E to D and C (predrill and use 2-1/2” screws). Make sure you observe the correct top/bottom orientation of the pieces.
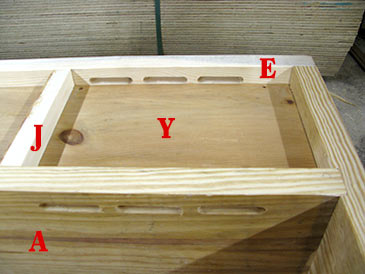
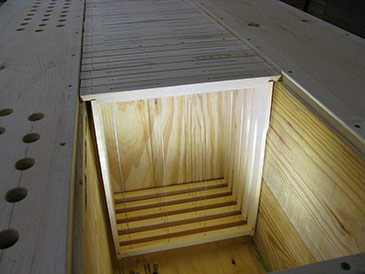
Step 12. Insert Y (2) between A and E and between B and F, predrill and attach to K, every 8”, with 1-5/8” screws. This forms the bottom of the tunnel the bees will follow to get in and out of each of the four hives.
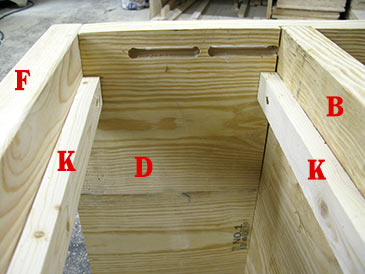
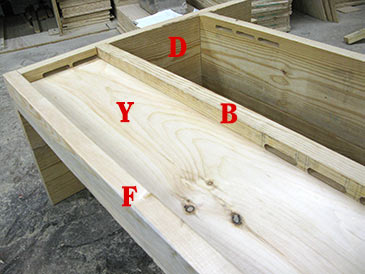
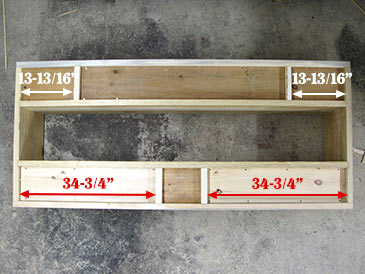
Step 13. Attach J to Y so bees from different hives don’t mix together. On the A side, J are 13-13/16” from the inside of C and D. On the B side, J are 34-3/4” from the inside of C and D. Predrill and attach with 1-5/8” screws, going through the underside of Y up into J.
Step 14. Cut the hive bottom M from the sheet of 3/4” plywood. While we are at that, cut four plywood divider boards P. Flip the hive to the side, insert M into the rabbet, predrill and attach with 2” screws, 1/2” from the edge, about every 8”, driving screws in at a slight angle.
Step 15. Drill 7/8” diameter vents at both ends of G. Good clean results with a simple paddle bit: drill half-depth from one side, finish the hole from the opposite side to prevent tear out; smooth the edges on the top side with 1/8” “round over” router bit. All holes are spaced 2-3/8” on center.
- First row — 2-11/32” o.c. from the inside edge of the board; four holes; first hole 5-13/16” o.c. from the butt end of the board.
- Second row — 4-13/32” o.c. from the inside edge of the board; three holes; first hole 7” o.c. from the butt end of the board.
- Third row — 6-15/32” o.c. from the inside edge of the board; four holes; first hole 5-13/16” o.c. from the butt end of the board.
- Fourth row — 8-1/2” o.c. from the inside edge of the board; three holes; first hole 7” o.c. from the butt end of the board.
Step 16. Drill 7/8” diameter vents at both ends of H. All holes are spaced 2-3/8” on center. Thirteen holes in each row.
- First row — 2-11/32” o.c. from the inside edge of the board; first hole 3-7/16” o.c. from the butt end of the board.
- Second row — 4-13/32” o.c. from the inside edge of the board; first hole 4-5/8” o.c. from the butt end of the board.
- Third row — 6-15/32” o.c. from the inside edge of the board; first hole 3-7/16” o.c. from the butt end of the board.
Step 17. Cut insect screens R (2) and staple them over the vents in G, from the underside. The edge of the screen is 1-1/4” from the inner edge of the board. Cut insect screens S (2) and staple them over the vents in H, from the underside. The edge of the screen is 1-1/4” from the edge of the board.
Step 18. Attach G to A, C, D, E. The outside corners of G are flush with the corners of E. Make sure the rabbet formed by G and A is 3/8” wide. Predrill and attach with 2” screws every 8”, avoiding all entrances. Screws are 3/4” from the edge of G over C, D, and E, and 1/2” from the edge of G over A.
Step 19. Attach H to B, C, D, F. The outside corners of H are flush with the corners of F. Make sure the rabbet formed by H and B is 3/8” wide. Attach with 2” screws every 8”, avoiding all entrances. Screws are 3/4” from the edge of H over C, D, and F, and 1/2” from the edge of H over B.
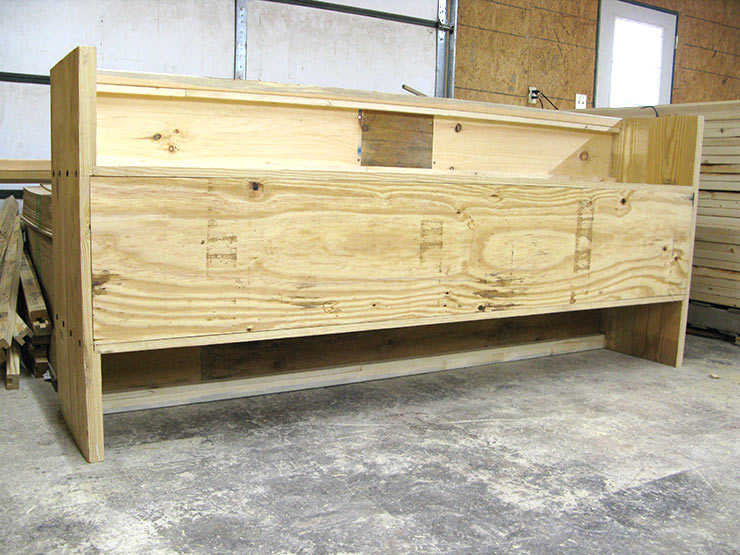
Oh dear! Look! The bee bed starts to look like a coffin! And as you keep drilling and screwing, your thoughts turn to your family, to the brevity of human life, to the beauty of our tiny planet under the cold black starry sky, to the vastness of eternity, and to the bees. They will endure the snow and cold clinging to one another in the hive you are building, but come the warm days of springtime, each bee will quickly wither away, surrounded — just as us at our passing — by the fragrance of flowers and the young generation that she helped raise and that will now take her place in the world of the living. And as you are thinking about your loved ones — those who are with you and those who returned to the earth in a pine box of their own — a tear drops on the board that, too, was once alive.
Step 20. Position L (2) over C and D, flush with the inner side. Attach with three 2” screws.
Step 21. Insert divider boards P into the hive. Verify that their tops are flush with the top of A and B. Apply a bead of glue to the top of P, cover with Q (leaving 1/16” gap on each side of Q — between Q and G, and between Q and H). Predrill and attach with four 1-1/4” screws. Use three dividers to divide the hive in four equal compartments; the fourth divider in reserve.
Oh! My honey is bringing some frames to fill the hive, just in time.
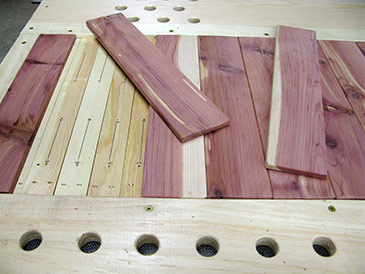
Step 22. Cut the 2” x 4” cutoffs (saved in Step 2) to 14-3/8” long; then resaw into N (24). These are the cover boards to cover the frames and make a surface flush with G and H. The best material for these planks is actually eastern red cedar: it is very stable and does not cup during use. Round the edges or each board. Trim the last board to size, leaving a 1/8” expansion gap between it and the wall.
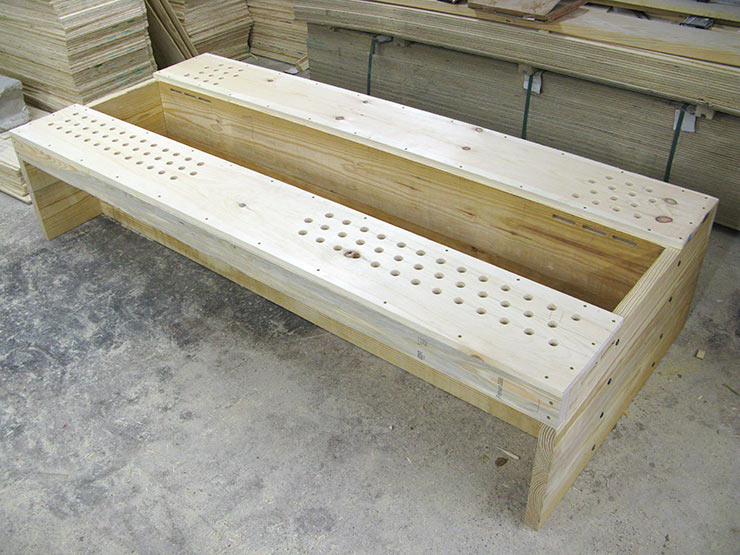
That is a grand piano of a beehive, and you made it!
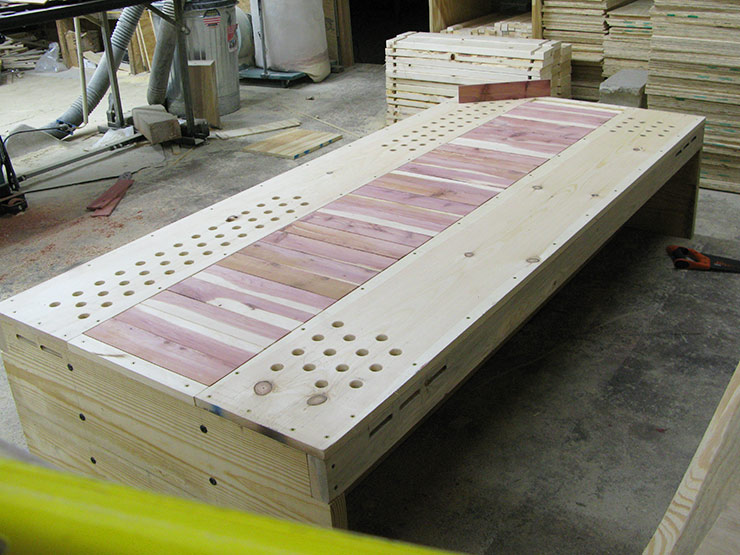
This completes the construction of the bee bed. The cover boards will be warm with the warmth of the bees, and you will feel their vibration. You will be surrounded by their buzzing, and the intricate hive entrance system will drive fragrant hive air into your space.
After installing the bed in its permanent location, build an enclosure over it. A good design would be a chamber some 48” tall on the inside, with a peak or shed roof; enclosed an all four sides; with a big window on the side of E to watch the bees; and two big hinged doors on the side of F to get in and out and to care for the hives. Click here for the plans — Layesn Bee Bed Part 2.

If you haven’t signed up for our email list yet, please join it below so we can notify you when more free plans and free guides become available. (Only 2-3 emails per year, and you can unsubscribe at any time.) We are working on bringing you the bees... and the smile!
— Dr. Leo Sharashkin, Editor of “Keeping Bees With a Smile”