


Layens Divider Board Plans
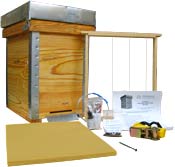
LAYENS HIVES & FRAMES AVAILABLE FROM OUR STORE >>
Hives include all frames, fully assembled & ready to go
A simple divider board comes in handy when first installing small (swarm) colonies in horizontal hives; when making splits; lodging two colonies in the same box; cutting off the empty hive space for the winter; and in many other situations. To be sure, Georges de Layens himself did not use division boards and called them “superfluous,” but he kept bees of the hardy northern race in amply insulated hives and in a relatively mild climate. Since our conditions are different, you will find a divider board exceedingly useful.
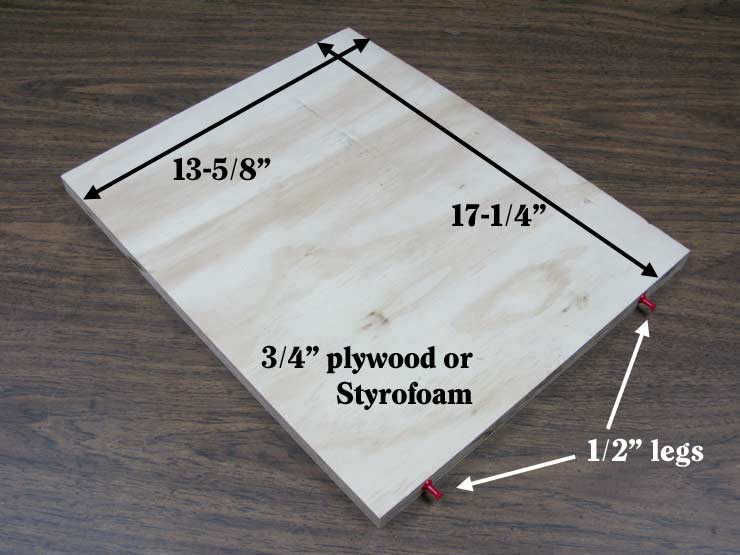
A divider board for Layens horizontal hives is very easy to make. Basically, it is a rectangular panel 13-5/8” wide (allows for a 1/16” margin) by 17-1/4” deep. It can be made from formaldehyde-free plywood or from foam board insulation (e.g., Styrofoam). Here are a few tips for successful construction.
Plywood. A plywood divider is very sturdy and will last a long time. Also, unlike Styrofoam, plywood is biodegradable at the end of its life cycle — an important advantage. At the same time, plywood dividers have lower insulation value (only a concern for very cold climates). Being rigid, plywood is not as forgiving as foam: if your hive is a tad too narrow, it simply won’t go in and you’ll have to trim it. Finally, bees can propolize the plywood dummy much stronger than they can plastic-covered Styrofoam, but I never had any problem prying it out with a hive tool.
Cut a 13-5/8” x 17-1/4” piece of plywood on a table saw or even with a handsaw. Thinner plywood warps more easily; 3/8” plywood will deform much more than 3/4” thick. 1/2” or 5/8” is usually all right, but 3/4” is the most stable of all — my recommendation. To minimize warping, use sanded grade (nice and flat, for furniture projects rather than for house construction).
Styrofoam dividers are lightweight, quite durable, and have good insulation value. In places with harsh winters they can be 1-1/2” or even 2” thick (especially if hive walls are not insulated). In southern Missouri (Zone 6) we’ve been using 3/4” thickness with excellent results. Foam never warps and it is also more supple: you can still insert it if hive width is a bit too narrow. Due to its sleek surface, bees don’t glue it to the walls as hard as plywood. My only reservation is that rigid foam is petroleum-based and cannot be composted or recycled.
For Layens hives, make it the same dimensions as plywood: 13-5/8” wide by 17-1/4” deep. You can cut it on a table saw (leaves a very clean edge), with a handsaw (messy), or with a sharp knife.
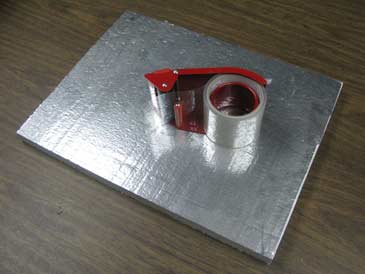
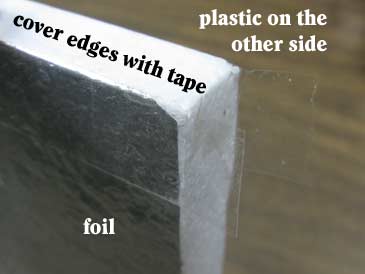
Important: all Styrofoam surfaces must be protected with foil or plastic, otherwise bees will chew it. Ideally, use foam with foil backing on one side, and plastic adhered on the other. Then you just need to seal the ends with strong-adhering packing tape (2” wide is helpful). If your Styrofoam has no plastic/foil backing, simply cover all exposed surfaces with tape, overlapping the strips by 1/4”. Done!
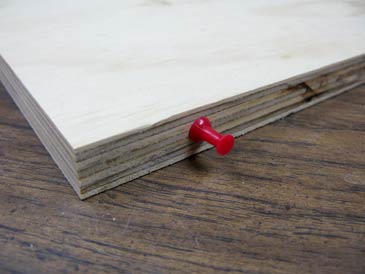
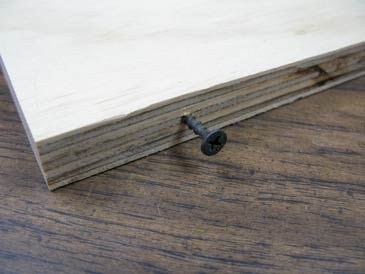
Legs. In some cases the divider board goes all the way down to the bottom of the hive (e.g., when making a split). In other instances, you need to leave a 1/2” to 3/4” gap under the board, e.g., for winter ventilation (see details in Keeping Bees With a Smile). So I like to make my divider boards with legs: when I need a gap, I insert it legs down. When no gap is needed, just flip it over and insert the other way.
Legs can be made of push pins (works great in both plywood and foam; easy to insert and remove if needed). For plywood dividers, you can also use 1” drywall screws partially driven in. Finally, you can simply put a small piece of wood or stone under the divider to prop it up when a gap is desired.
Using divider boards. I like using divider boards (with a gap underneath) when transferring swarms from Layens swarm traps into permanent horizontal hives. Limiting the space to 6 or 7 frames makes it easier for the swarms to get a good start. In areas with small hive beetles, it also helps the swarms protect their new combs from this pest. Check after two weeks and add more frames when the colony has drawn the first 6 or 7 frames 2/3 their depth.
Another important time to use the divider board is in preparation for winter. After pulling honey, place the divider after the last brood-nest frame (leave a 1/2” gap under the divider) and cover the top of the wintering frames with a 2”-thick wool pillow. That’s the setup described in Chapter 24 of Keeping Bees in Horizontal Hives.
LAYENS HIVES & FRAMES AVAILABLE FROM OUR STORE >>
Hives include all frames, fully assembled & ready to go
If you haven’t signed up for our email list yet, please join it below so we can notify you when detailed Layens hive management recommendations and more free plans become available. (Only 2-3 emails per year, and you can unsubscribe at any time.) With best wishes to you and your bees,
— Dr. Leo Sharashkin, Editor of “Keeping Bees With a Smile”