


Peaked Roof for Layens Insulated Hive – Free Plans and Advice
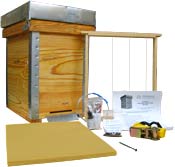
INSULATED LAYENS HIVES & FRAMES AVAILABLE FROM OUR STORE >>
Hives include all frames, fully assembled & ready to go
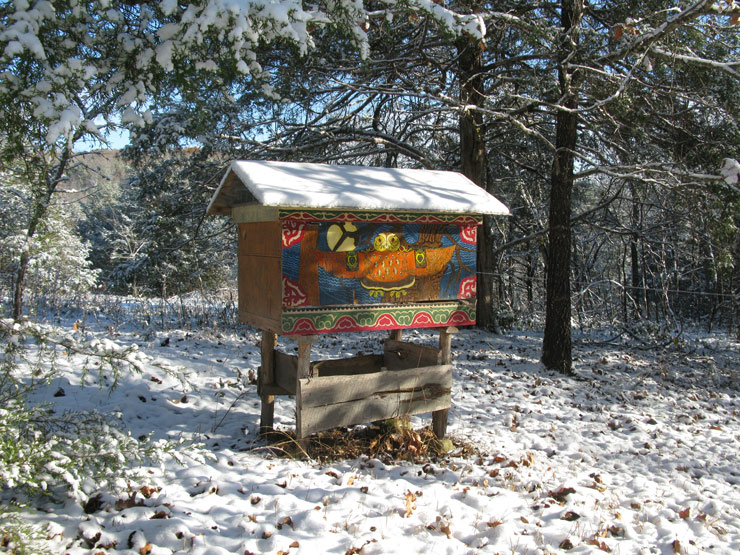
Peaked roofs on horizontal hives don’t just look pretty — they are functional. The overhang sheds water away from the hive walls, greatly extending their life, and shades the hive box during the hottest hours of the day. The ventilated attic space helps with temperature regulation, preventing overheating even in the hottest of summers. If your hive is decorated with fanciful designs, the peaked roof (also called gable roof) prolongs the life of the painting.
The 4” overhang is easy to add to flat roofs, too. Just put a piece of corrugated metal (called barn tin) on the hive roof and weigh it down with several stones. Barn tin has the right width of 26” and you can easily find it used for only $1 per linear foot. So it only takes $3 or $4 to create a durable cover for your hive. This cover is eco-friendly and recyclable. I use barn tin on all my hive boxes that don’t have peaked roofs yet, and I highly recommend it. If you use reclaimed barn tin, cut the panels to the desired length and patch the holes with roofing silicone — it will last many, many years.
IMPORTANT: In hot climates put two boards (like “two-by-two”) across the roof under the tin, to create a 1-1/2” air gap between the roof and the corrugated metal. In sunny weather the metal cover can become very hot, and the air gap prevents the transfer of this heat into the hive. Without the boards and the air gap, you risk comb collapse due to overheating.
Three shortcomings of corrugated metal panel placed on the roof are these: First, despite the heavy stones, it can be blown off in very strong winds. Second, you have to take the stones off and place them back every time you open the hive (which becomes onerous when you do a hundred hives in a day). Third, they just don’t look as pretty as the peaked roofs. One disadvantage of hinged gable roofs is that they make horizontal hives more difficult to move. As you know from Layens’s book, Keeping Bees in Horizontal Hives, moving hives (or swapping hives places) can be very beneficial when breeding bees and multiplying the number of hives for your apiary or for sale — peaked roofs make these manipulations a bit more difficult. Here are the plans for adding a gable roof to the Layens insulated hive. The same design can be applied to other hive models — just modify the dimensions. You can also use these plans for adding the peaked roof to the existing flat roof on your insulated Layens hive.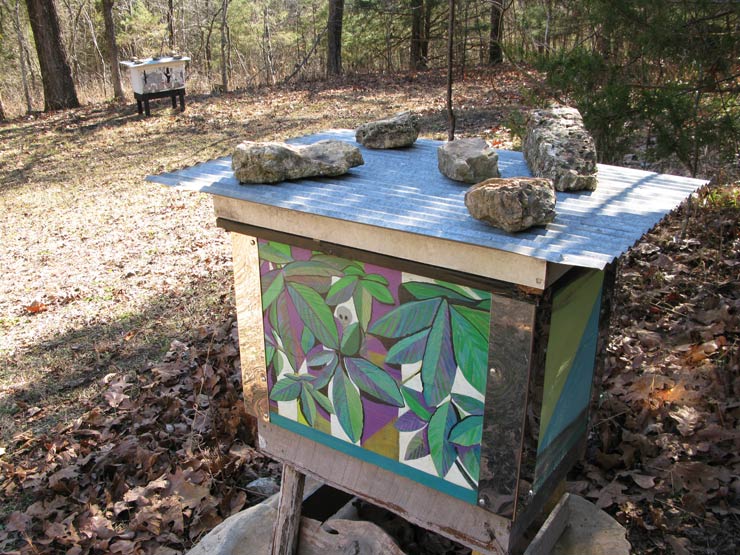
MATERIAL LIST
- 11/32” plywood, untreated, 4’ x 8’ sheet makes 2 roofs
- 1” x 4” x 8’ softwood board (pine, fir, etc.), untreated (actual dimensions: 3/4” x 3-1/2” x 8’). Quantity: 2
- 2” x 4” softwood board (pine, fir, etc.), untreated (actual dimensions: 1-1/2” x 3-1/2”). Small piece (just 8” long)
- Aluminum flashing, 28” wide x 45” long (usually comes in 50-ft rolls)
- 2” tee hinges (3) with #6 3/4” screws
- #8 hardware cloth (1/8” wire mesh), 11” x 10”
- Metal insect screen (aluminum or stainless steel), 8” x 4”
- #6 1-1/4” wood screws (9)
- 2-1/2” exterior/deck screws (4)
- 1-5/8” deck screws (12 or 32)
- 1-1/4” drywall screws, coarse thread (16)
- 1” narrow-crown staples or nails
- 3/8” T50 staples, stainless steel
- 5/16” T50 staples
- Wood glue, exterior (e.g., Titebond II)
FINISHED ROOF DIMENSIONS
- Exterior L 44-1/4”
- Exterior H 7”
- Exterior W 26”
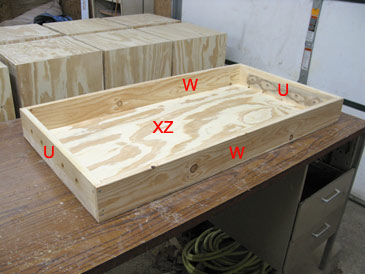
PART LIST
Plywood panels, 11/32” thick
| XZ | 38-1/8” x 20” | top cover - can be made of more than one piece |
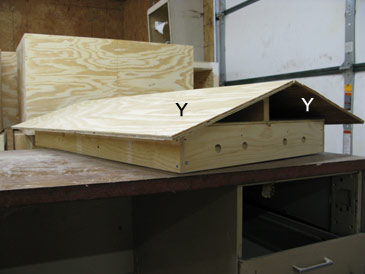
| Y (2) | 44-1/4” x 13-1/2” | roof slopes |
Lumber (untreated softwood stock)
| W (2) | 38-1/8” x 3-1/2” x 3/4” | top’s frame, long |
| U (2) | 19-1/4” x 3-1/2” x 3/4” | top’s frame, short |
| F (2) | 36-9/16” x 3/4” x 3/4” | slats for propping up the top, long |
| T (2) | 16-15/16” x 3/4” x 3/4” | slats for propping up the top, short |
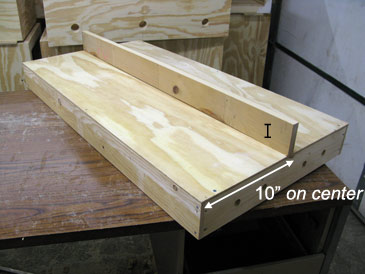
| I | 38-1/8” x 3” x 3/4” | ridge beam |
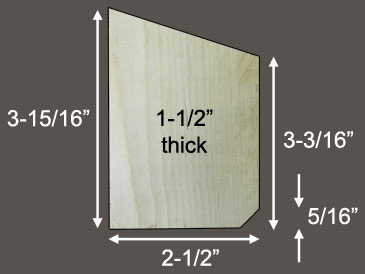
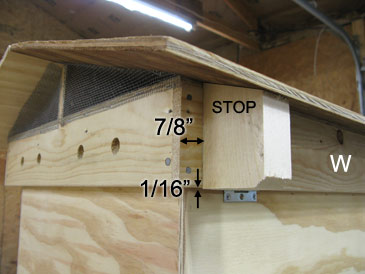
| STOP | 3-15/16” x 2-1/2” x 1-1/2” | stopping block, tapered - see Step 13 |
Metal
| D | 45” x 28” x 0.014” | aluminum flashing as roofing material |
| Mesh (4) | 11” x 5” to 0” | wire mesh for gables, #8 hardware cloth |
| V (4) | 4” x 2” | insect screen, aluminum or stainless steel |
BUILDING INSTRUCTIONS
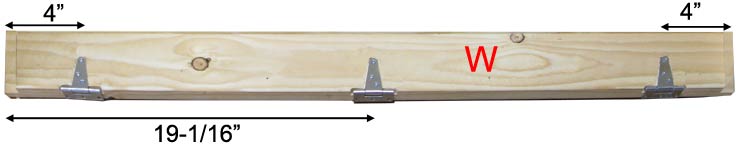
Step 1. Cut the two 1” x 4” x 8’ boards into the parts W (2), U (2), F (2), T (2), and I. W, W, and U are cut from one board; all the remaining parts — from the other board.
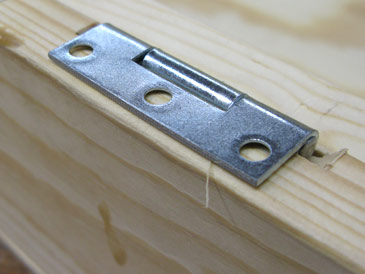
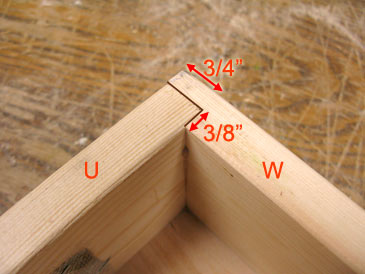
Step 2. Cut rabbets 3/4” wide x 3/8” deep on both ends of each W.
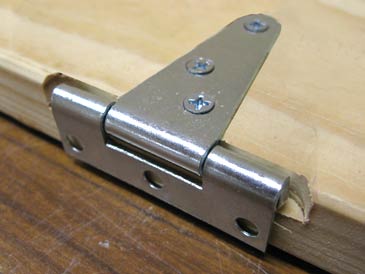
Step 3. Cut recesses for hinges in one W, on the same side as the rabbets, 4” on center from each end of W, and one in the middle (19-1/16” on center from the end). Mark the position of the hinge with a pencil and cut out the recess as shown, using a router, a chisel, or an oscillating saw. The leg of the tee should be flush with W; the barrel should be recessed so when the hinge is folded 90°, the plate lies flat on the edge of W. Do not attach the hinges yet or they will be in the way as you assemble the lid. You’ll install the hinges in Step 8 below.
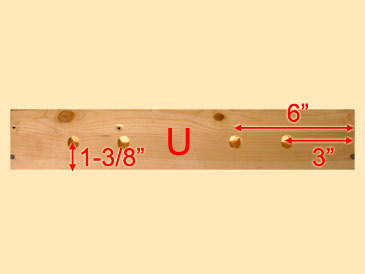
Step 4. Mark the edge of U that will be outside and bottom once assembled into a lid. Drill four 5/8” holes in each U: 1-3/8” on-center from the bottom edge of U and 3” and 6” from each butt end. Drill at and incline so it sheds water. On the other (inside) side of U, cover the openings with metal insect screen V (four 2” x 4” pieces) and staple into place.
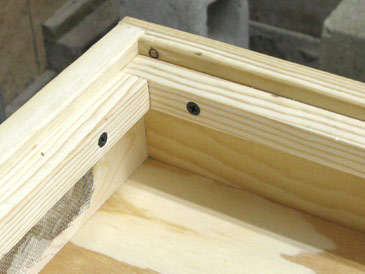
Step 5. Place U into the rabbets in W, square, predrill and attach with glue and 1-5/8” deck screws, two per corner.
Step 6. Attach XZ to the U-W frame. Make sure the recesses for the hinges are along the W edge away from XZ. Use glue and 1” staples or other fasteners.
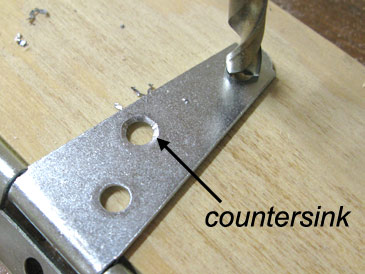
Step 7. Using a 1/4” drill bit for metal, drill countersinks in the “legs” of the three hinges, on the side opposite the factory-made countersinks. (Countersink is the small bevel for the screw head to be flush with the surface.) Go at very slow speed — don’t cut all the way through!
Step 8. Install the three hinges in the recesses you prepared in Step 3. Predrill screw holes 1/2” deep with a 1/16” bit and attach with #6 3/4” wood screws included with the hinges.
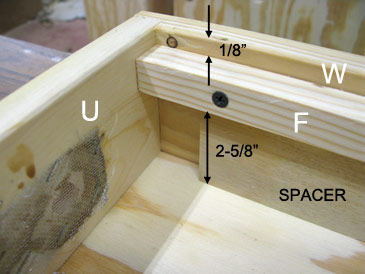
Step 9. The hive lid is supported in the propped-up position by four slats, F (2) and T (2), attached to the inside of the lid. Predrill 5 holes in F and 3 holes in T. Make a 2-5/8” x 8” spacer from some scrap plywood. Put the lid upside down. Position the spacer against XZ, put F over it, and drive 1-1/4” drywall screws into the predrilled holes, starting from one end. Move the spacer as you go. Repeat with another F. To attach T, drive in the central screw first. Before driving in the end screws make sure the upper surface of T is flush with the upper surface of F. When attached, the F and T are recessed 1/8” from the edge of the lid.
Step 10. Position I upright along the center of XZ (10” on center from the edge of the short side). Make sure I is square to XZ, predrill the ends of I at 45° and attach I through XZ into U with one 1-5/8” screw per end, driven at an angle.
Step 11. Position both Y along the centerline of I; make sure Y protrudes equally 3-1/16” beyond I on each end. Attach Y to I and W with 1-5/8 ” screws (predrill with a countersink bit) or with 1” staples.
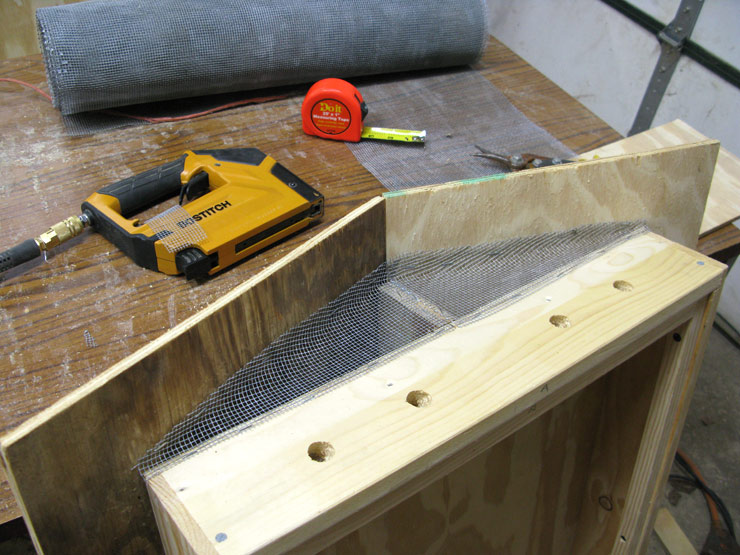
Step 12. Cover both gable ends with 1/8” wire mesh and staple to U, I, and Y with 5/16” T50 staples. A pneumatic gun works best for this operation. Please do not neglect this step. If you leave the gables unprotected, the space under the roof will provide home opportunities for wasps, birds, even mice.
Step 13. Make two STOP blocks that prevent the lid from opening too far and damaging the hinges. Start with a 3-15/16” x 2-1/2” block 1-1/2” thick. Trim one end down to 3-3/16” (that’s 17°). Then cut off 5/16” at 45° from the other corner, for good looks. Position it under the roof 7/8” from the ends of the hinged W. Predrill and attach with two 2-1/2” screws from the inside (going through W into STOP) and with one 1-5/8” screw through Y into STOP. This stopper should fit snugly against W and Y, and will protrude 1/16” past the lower edge of W.
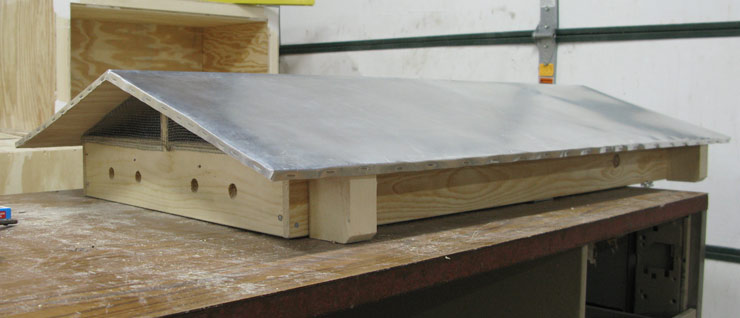
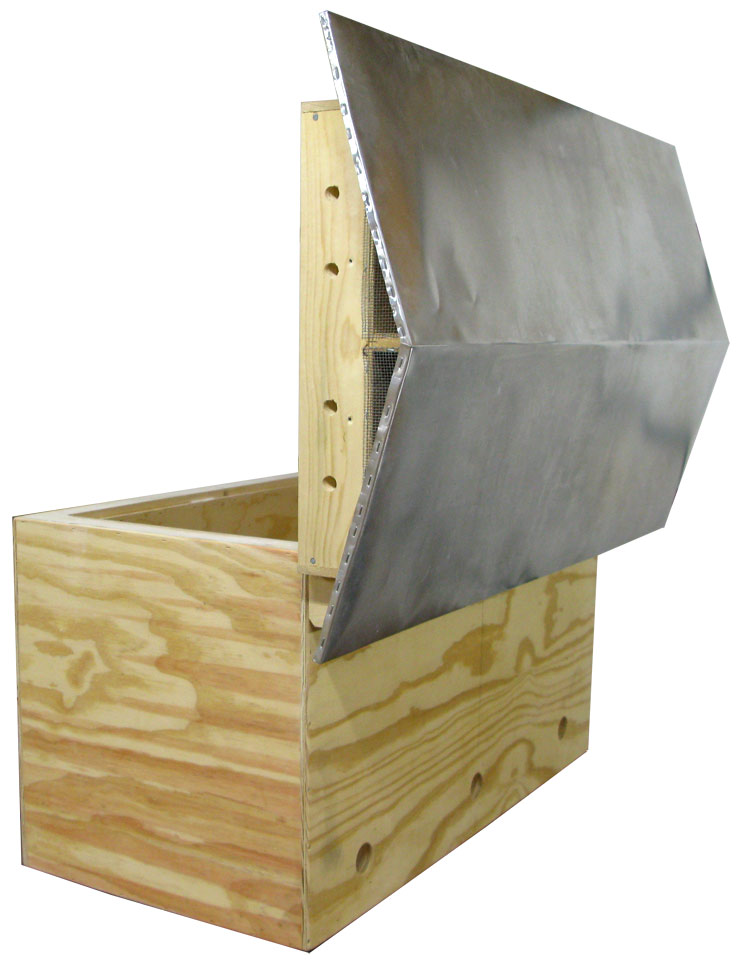
Put the assembled roof on your hive and admire your work. My goodness! It will look gorgeous when finished.

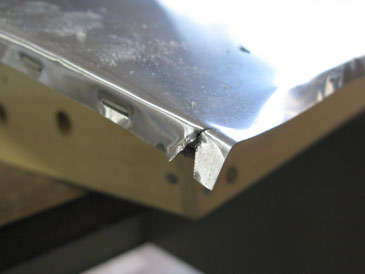
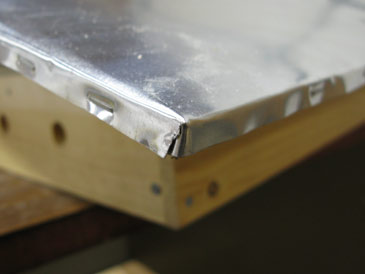
Step 14. Cut a piece of 28”-wide aluminum flashing, 45” long. (Position a metal ruler on the cut line, score hard with a utility knife, then flex the flashing and it snaps.) Score gently with the back of the utility knife’s cutting tip along the central line of the flashing (14” from the corner, running the length of the panel). Clamp the scored line between two boards, line down, and push down to form the ridge. Your flashing now has a V shape corresponding to the roof. Position it over the roof’s plywood panels (Y), with 3/8” of aluminum protruding on all sides. Clamp at four corners, then fold the aluminum edges down and staple them to the Y edge with 3/8” stainless steel T50 staples. (Do it along one gable, then another gable, then the long sides starting from the middle.) Notch the four corners as shown and tuck the tab under. One key to making this metal work neatly without special tools is to use very thin metal (0.014”).
Step 15. Put the completed roof on the hive with hinges on the entrance side. Make sure there’s 1/8” clearance between each U and the hive wall. Predrill with 1/16” bit and attach hinges to the hive body with three #6 1-1/4” wood screws per hinge. Do not use the short 3/4” screws that come with the hinges — they are not long enough. Use 1-1/4” wood screws specially bought for this purpose.
You will notice that this roof has no insulation in it. This is because in Layens hive design, the space above the top bars is left open for ventilation during the summer, and filled with insulation (e.g., a wool-filled pillow) for the winter months. See details in Keeping Bees in Horizontal Hives.
Behold your hive roof! It looks like a giant sail of a freedom-loving frigate. Another gust of wind, and you and your bees will be transported into the beauteous world of natural beekeeping. I’ll meet you there.
INSULATED LAYENS HIVES & FRAMES AVAILABLE FROM OUR STORE >>
Hives include all frames, fully assembled & ready to go
If you haven’t signed up for our email list yet, please join it below so we can notify you when detailed Layens hive management recommendations and more free plans become available. (Only 2-3 emails per year, and you can unsubscribe at any time.) We are working to bring you the bees... and the smile!
— Dr. Leo Sharashkin, Editor of “Keeping Bees With a Smile”