


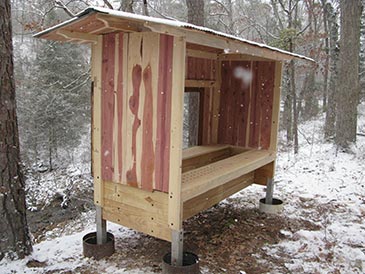
Layens Bee Bed – Sleep With The Bees – Free Plans Part 2
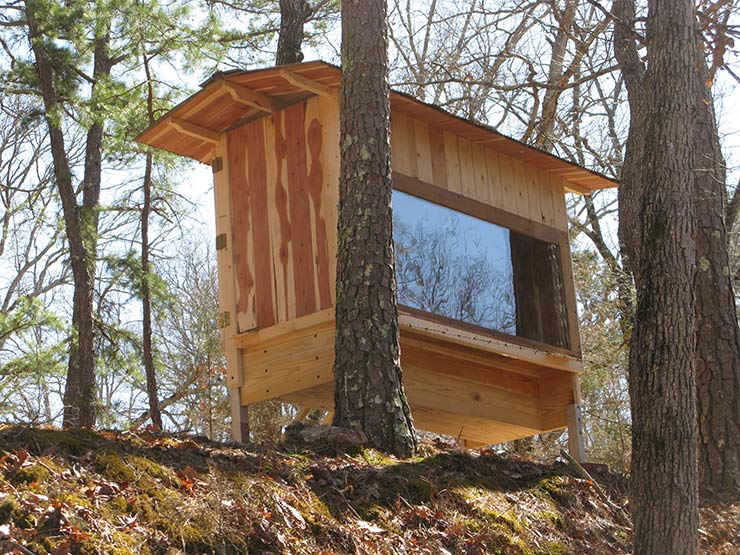
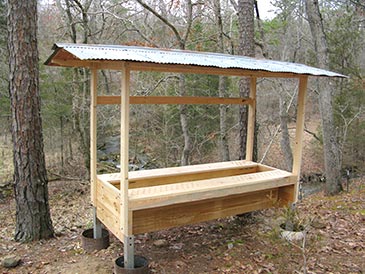
Now that your beautiful Layens bee bed is complete, let’s build a sleeping chamber on top and install it in a picturesque natural spot.
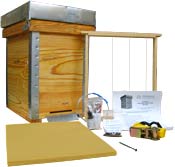
MATERIAL & PART LIST
I used a lot of reclaimed materials in this project, but here is what to get if you are buying everything new.
- 2” x 4” x 8’, untreated (5) — will make:
- 2” x 4” x 10’, untreated (3) — will make:
- 2” x 6” x 8’, untreated (2) — will make:
- 2” x 6” x 10’, untreated (1) — will make:
- 1” x 4” x 10’, untreated (1) — will make:
- 1” x 6” x 10’, tongue and groove (20 with window; 27 without) — will make:
- 1” x 6” x 8’, tongue and groove (8) — will make:
- 3/4” exterior plywood, untreated 4’ x 4’ sheet — will make:
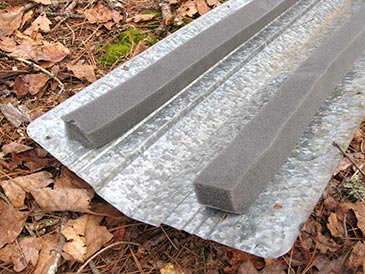
- 26” x 10’ roofing metal panels (3) — will make:
- 10’ ridge cap for the roof (Step 7).
- Window. I used a French door 76-7/16” x 34-1/4” x 1-9/16” (Step 8).
- 20’ universal foam closure for the roof (Step 7).
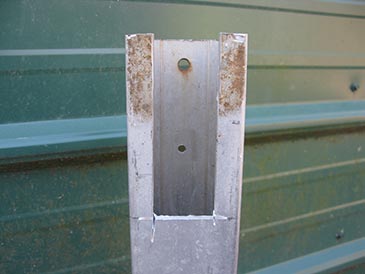
- 1-1/2” U-channel or 1-1/2” steel angle, 1/4” thick, 80” makes four 20” legs (Step 2).
- Steel containers at least 8” diameter and 8” deep (4) to put legs in (Step 1).
- Insect screen, metal, 12” x 48” to cover gables (Step 10).
- 3/8” exterior plywood, untreated, 10” x 17” for landing boards (Step 10).
- Door hinges (6).
- 2-7/8” structural screws — HeadLOK or similar (40).
- 1-1/4” exterior screws (56).
- 1-5/8” exterior screws (5 lb).
- 3” deck screws (10).
- 1/2” eye screws (4) and carabiners (2) for door stopper (Step 10).
- Metal roofing screws (160), length between 7/8” and 1-1/2” depending on your metal panels.
- 1/2” T50 staples (100).
- 1-1/4” narrow-crown staples (100).
- Butyl tape, 12’.
- Titebond III wood glue, 8 oz bottle.
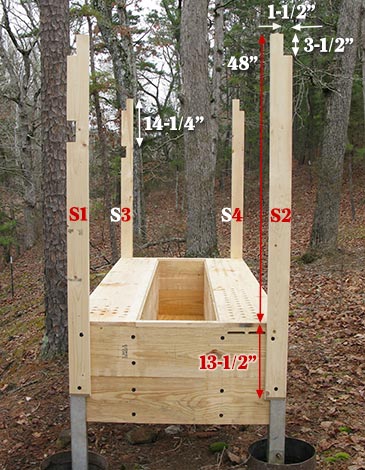
| S1, S2, S3, S4 | 61-1/2” x 3-1/2” x 1-1/2” | studs; notched (Step 4) |
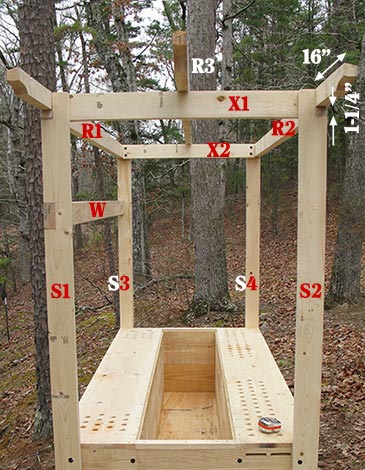
| X1, X2 | 34” x 3-1/2” x 1-1/2” | joists, top framework (Step 5) |
| W | 88” x 3-1/2” x 1-1/2” | window support board (Step 5) |
| R1, R2, R3 | 120” x 3-1/2” x 1-1/2” | beams; R2 notched (Step 5) |
| DOOR-H (4) | 43-3/4” x 2-7/16” x 1-1/2” | door frame, horizontal part (Step 9) |
| DOOR-V (4) | 47-1/2” x 2-7/16” x 1-1/2” | door frame, vertical part (Step 9) |
| TRIM-L (2) | 88” x 2-5/8” x 1-1/2” | horizontal trim under doors and window (Step 9) |
| TRIM-S (2) | 30” x 2-5/8” x 1-1/2” | horizontal trim on end walls (Step 9) |
| DOOR-B (2) | 60” x 3-1/2” x 3/4” | diagonal brace for doors (Step 9) |
| ROOF (48) | 29” x 5” x 3/4” | roof boards (Step 6) |
| SIDING (15 with window; 30 without) | 50-1/4” x 5” x 3/4” | siding (Step 8) |
| DOOR (16) | 42-1/2” x 5” x 3/4” | door panel (Step 9) |
| SKIRT (4) | 20” x 20” | skirts (Step 10) |
| ROOF-METAL (10) | 30” x 26” | roofing (Step 7) |
BUILDING INSTRUCTIONS
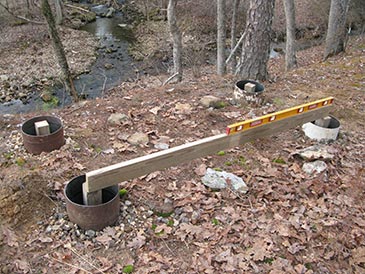
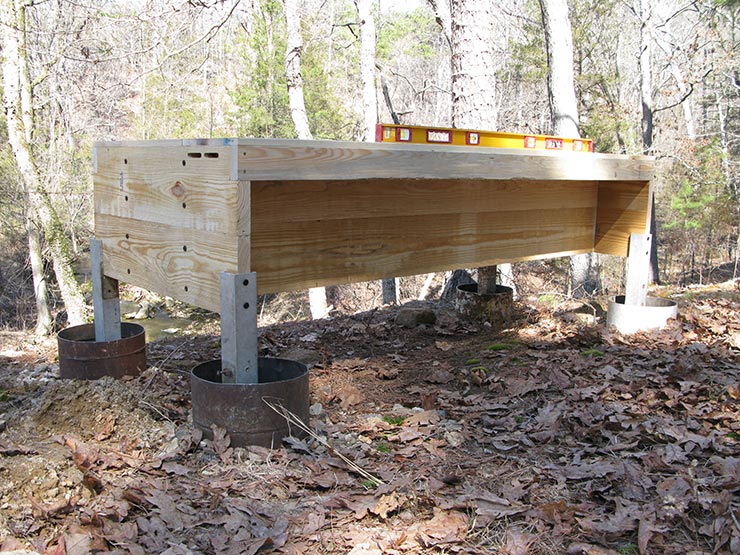
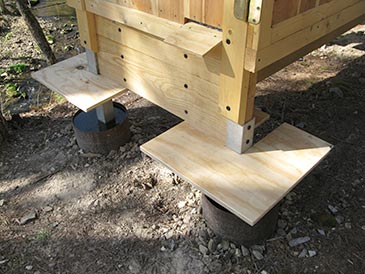
Step 1: Water-holding containers. For your enjoyment of the bee bed, it’s extremely important that the bee bed’s legs stand in water. This stops ants and roaches from occupying the bed and biting you as you are trying to relax.
For the containers, I used old propane tanks that I cut in half with an angle grinder. Make sure the tanks have no propane left — drain, then unscrew the top valve before cutting. The cutting process generates enough noise to poison the entire neighborhood against you. Stainless steel pots at least 8” diameter and 8” deep will work too. The container should be very strong to support heavy weight and not crack when water freezes (plastic buckets or thin metal bowls won’t work).
Install the containers so their centers correspond to the four corners of the bee bed (37” x 85”; 92-11/16” diagonal). Check with a level and record depth differences: if the terrain is very uneven, you’ll need to make legs different length.

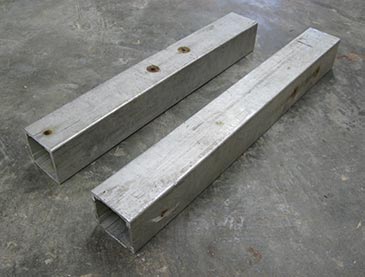
Step 2: Legs. I used a 2-3/4” square aluminum post that was lying around. (If I had no post, I would have used a 1-1/2” x 1-1/2” steel angle at least 1/4” thick, or 1-1/2” steel U-channel.) In one wall, I cut a 1-1/2” x 4-5/8” slot and drilled two holes for screws in the opposite wall. Flip the bed upside down and attach each leg with two 2-7/8” structural screws such as HeadLOK. I made the base leg 20” long, of which 4-5/8” overlays the wood (net height 15-3/8”). I made each leg slightly different length because of my sloping terrain.
Step 3: Install in place. Have four people carry the bed and lower the legs into the four containers you prepared in Step 1. Check with a level. Fine-tune by adding some gravel under the legs. If your legs and your containers are different metals (mine are steel and aluminum), add rocks or gravel under the legs so they don’t touch the container, to prevent corrosion.
Step 4: Studs. Cut four 1-1/2” x 3-1/2” x 61-1/2” studs (S1 through S4), notch one end 3-1/2” x 1-1/2” to receive the beams. Position along bed’s edge so 48” of the stud is above the bed surface (13-1/2” stud overlap with end wall). Attach with two 2-7/8” structural screws (HeadLOK), notches facing outside. I cut additional 3-1/2” x 1-1/2” notches in S1 and S3, 14-1/4” down from the top end, to attach a window (Step 8).
Step 5: Top framework. Cut two 1-1/2” x 3-1/2” x 34” (X1 and X2) and connect to the top of S1-S2 and S3-S4, on the inside, with two 2-7/8” structural screws. Take three beams 1-1/2” x 3-1/2” x 10’ (R1, R2, R3). Notch both ends of R2 16” x 1-1/4”. Insert R1 into the notches of S1-S3, and R2 into the notches of S2-S4 (projecting 16” on each side), attach with two 3” deck screws per connection. Position R3 over the center of X1 and X2 (projecting 16” on each side), attach with a 3” deck screw at an angle. I shaped the ends of these beams for good looks; this is optional. Finally, attach a 1-1/2” x 3-1/2” x 88” board W inside the lower notches of S1 and S3 if you have the same window as mine (see Step 8).
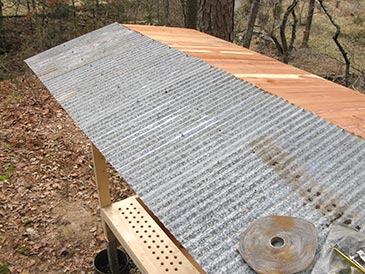
Step 6: Roof boards. Roof boards are 3/4” x 29” tongue and grove; board widths may vary — you’ll need enough to cover two slopes 10’ wide each. I milled mine from salvaged red cedar lumber that was destined for mulching. Attach to the beams with nails or predrill and use 1-5/8” exterior screws.
Step 7: Roofing material. I used reclaimed barn tin: 10 panels 30” long and 26” wide. Attach with metal roofing screws to beams; put butyl tape where panels overlap. Attach universal foam closure to the ridge cap; attach the ridge cap with metal roofing “stitch” (7/8”) screws. Cut off any screw tips protruding under the roof boards. Seal any holes in used roofing with roofing silicone.

Step 8: Window and siding. I reused an old French door for window (76-7/16” x 34-1/4” x 1-9/16”), predrilling and attaching it with six 2-7/8” structural screws to W, five to E (see bee bed plans) and four to S1. The rest of the three walls was covered with tongue and groove boards attached with 1-5/8” exterior screws. Siding boards run vertically: top end is attached to the boards X1, X2, and R1, and bottom end to the body of the bee bed, notching around the entrances. If you have no window, you’ll use boards 50-1/4” tall throughout; width may vary; you need a total of 30” wide for each of the side walls and a total of 88” wide for the front wall if there’s no window. The window is optional; modify your framing in earlier steps if you have no window or if it is sized differently.
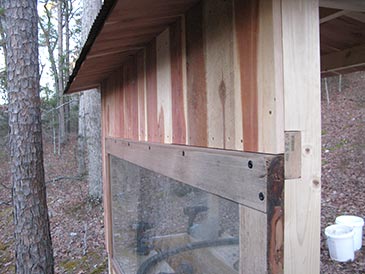
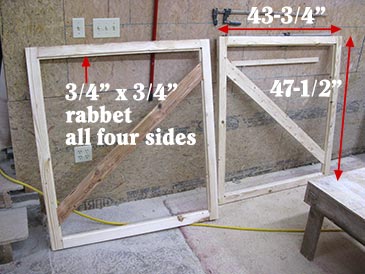
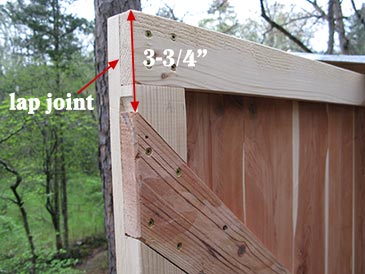
Step 9: Doors. Make two frames 43-3/4” wide x 47-1/2” high. Cut four parts DOOR-H 43-3/4” x 2-7/16” x 1-1/2” and four parts DOOR-V 47-1/2” x 2-7/16” x 1-1/2”. Make lap joints: at each end of each board cut a rabbet 2-7/16” wide x 3/4” deep (half the board thickness), glue and screw to make the frame. Add a diagonal brace DOOR-B 60” x 3-1/2” x 3/4” embedding it into the frame 3-3/4” from the corner — connect with glue and screws, trim flush with the frame. Cut a 3/4” x 3/4” rabbet around the perimeter of the frame and fill with tongue-and-groove paneling (glue and staple 42-1/2” boards in place with 1-1/4” narrow crown staples). After glue sets attach to the bee bed with three door hinges per side. The top of the door overlaps R2 by 1/2” and swings open clear of the edge of the roof. I additionally attached a 88” x 2-5/8” x 1-1/2” board (TRIM-L) under doors to help support their weight. Similar trim was attached to the remaining three sides for good looks: TRIM-S 30” long on short sides and TRIM-L 88” long on the long side under the window.
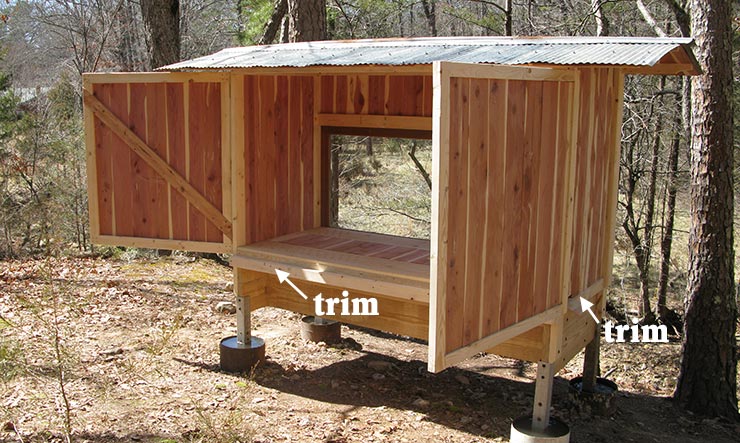
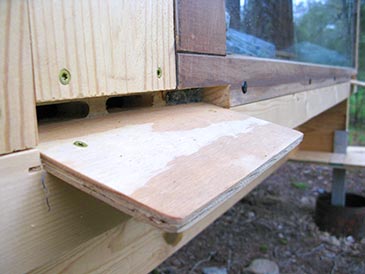
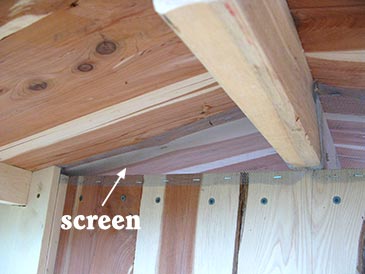
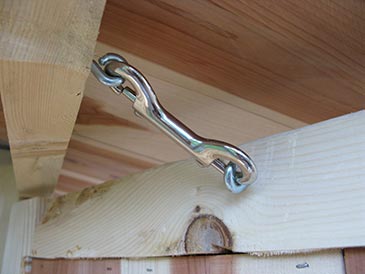
Step 10: Final touches. Four skirts (3/4” plywood 20” x 20”) wrap around the legs so bees don’t fall into the water containers. They are attached with 1-5/8” deck screws to the body of the bee bed from below. • Landing boards made of 3/8” plywood slanting 15° are attached under the entrances with 1-1/4” exterior screws: 6 3/4” x 5” for side-wall entrances, and 10” x 5” for front-wall entrances. • Metallic insect screen covers gable ends under the roof, stapled in place with 1/2” T50 staples. • Weather strips (threshold) is attached between the doors to prevent insect entry. • Carabiner and eye screws hold the door in open position so it does not flap in the wind when you work the hives. • Door latches and handles to taste.
OPERATING SUGGESTIONS
- Regularly replenish water in the containers to maintain a moat against ants, roaches, etc. To stop mosquitoes from breeding in that water, add a fair amount of table salt or a small quantity of vegetable oil. Prevent any vegetation from touching the bee bed as it would provide an alternative route for ants and roaches.
- Populate the bee bed with four strong swarms (natural or artificial — see Layens book and Raising Honeybee Queens on how to reliably multiply your colonies).
- Keep the colonies very strong and full of bees; regularly remove excess brood and honey (make splits) to alleviate congestion and prevent swarming.
- When working the hives, cover the window with cardboard or plywood so bees fly out the door instead of bumping against the glass.
- When the bee bed is not in use, cover the vent holes with heavy fabric, boards, or another material. This will prevent excess moisture entering the sleep chamber, and the bees are less likely to propolize vent screens if there is no constant movement of air through them.
- Sleeping with the bees is said to promote female and male fertility, even to the point of being used in infertility treatments. You’ve been warned! :)
Sweet dreams!

If you haven’t signed up for our email list yet, please join it below so we can notify you when more free plans and free guides become available. (Only 2-4 emails per year, and you can unsubscribe at any time.) We are working on bringing you the bees... and the smile!
— Dr. Leo Sharashkin, Editor of “Keeping Bees With a Smile”